Tag: collaboration

  • How to use Realtimeboard in the Classroom

    Yesterday I posted about Realtimeboard, an online whiteboard I have begun using in my class to collate and collect the work that we work on together.

    Today I plan to take you through the steps for getting started, making your first board and general use of the app. I’m sure that I won’t be able to cover everything that the app can do, but hope to give you enough of a start so that you can realise for yourself the power of this software and how you might start using it in your classroom.

    Step 1. Getting Started

    I am going to assume that you’ve managed to get yourself signed up, and hopefully have managed to get approved for an educator account. If not, I highly suggest that you do. Go to realtimeboard.com/education/ and fill in the form. They actually get back to you a lot sooner than they suggest.

    Once you have signed in, you’ll be greeted by your dashboard. You may get a “What’s New” as is customary these days with these kinds of apps.

    The dashboard is relatively straight forward. You have your created boards at the top, and some demo boards below.

    Clicking on the Google inspired blue “plus” circle will create your first board.

    Realtimeboard has done well to make this app resemble any of the native Google Apps, by including “Shared with me” and “Last Opened” menu filters on the left hand side.

    At the top right, there are account links and settings options.

    Click the plus to create a new board.


    Step 2. The Workspace

    Navigating

    The Realtimeboard workspace is essentially an infinite ‘canvas’ or board stretching out beyond the edges of the screen. There are a few, quick tips you’ll need to know for getting around.

    1. Using the mouse roller button, or doing two finger scroll on most trackpads these days will zoom in and out from your canvas. It zooms towards or away from the position of the mouse cursor on the screen.
    2. Clicking on the canvas and dragging allows you to move around the canvas at the current zoom rate.
    3. Clicking on an object selects that object and allows you to perform different operations with them.
    4. Double clicking will centre and zoom (in or out) to fit the selected object to the whole viewport.
    5. Arrow keys also allow you to move around the canvas
    6. Esc key exits from the current operation. If you are typing text, it will go back and show the selection of the text box. Pushing Esc again will deselect the textbox. Obviously, if you’ve only selected a shape, pushing Esc once will deselect it.

    Zooming in and out allows you to get right into the little details, as well as zoom out to see an overview of your board. Using these together, especially with frames mode creates great transition animations as the viewing screen zooms in and out to fit the screen.

    Top Left

    The top left, as with many Google Apps that Realtimeboard has mimicked, includes the Title & Document Name and a Home button to return you to the Dashboard.

    In addition, Realtimeboard offers an “Export” button, which allows users to save the board off in a range of different formats. This is incredibly useful for a number of reasons and uses, such as including the board in a different document, keeping an archived version of the board, or merely just backing up. It also allows you to save it straight to your Google Drive; if you have linked your account.

     

    Tools

    Realtimeboard includes all the tools you would expect to find in such an app. Each tool even has a shortcut key which is incredibly helpful for quickly changing tool. I’ve included these in square brackets.

      The pointer tool has two options. One is the standard Select tool [V], and the other is the hand, or Pan [H], which allows users to drag the viewport around the canvas. The select tool defaults to the hand tool when clicking on the canvas background instead of an object on the board.
      The Text tool [T] brings up a standard text cursor that users can use to create text boxes on the whiteboard using click and drag
    Hello Sticky Notes [N]! This is possibly one of the cooler tools that can be used to show key bits of information, or student’s ideas and suggestions. You can post one at a time, square or landscape, or create multiple notes at once. Great for writing down different student views from around the class!
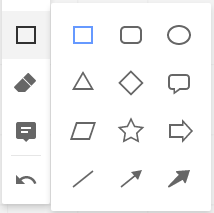
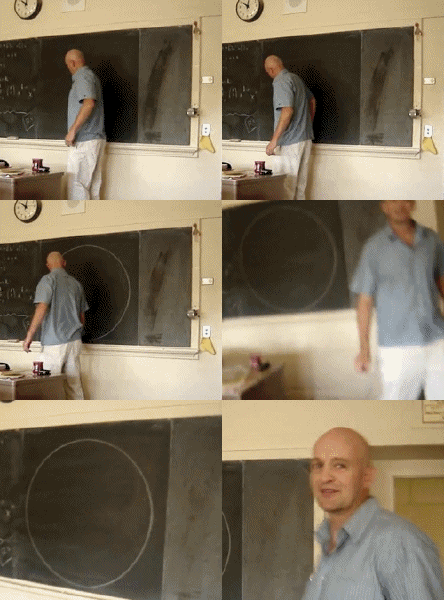
    It wouldn’t be a whiteboard without the Shape [S] tool. Gone are the days of teachers having to practise drawing perfect circles on their blackboard. Now, just select the shape and then click and drag it to the desired size on your canvas.

    You can also add text to shapes!

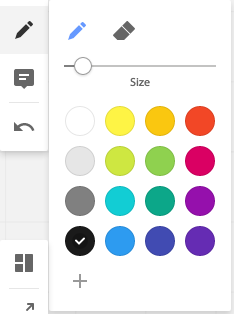
      The Pen [P] and Eraser [E] tools are great additions for the whiteboard. You can quickly select the desired size and then free hand draw or write onto the canvas with a selection of colours. While these are initially limited, you can also add your own custom colours from the spectrum.

    The eraser tool works really well, but only for lines drawn with the pen. It does not erase shapes for example.


    Comments [C] are integrated into Realtimeboard much like they are in Google Apps. You can even mention other collaborators directly. Like in Google Docs where you can assign comments to words or lines or sections, you can place comments on any part of the canvas.
       Undo [Ctrl+Z or Cmd+Z] is the most used tool, and it’s no surprise that the folk at Realtimeboard have built this into their app, along with the common shortcut people will be used to.
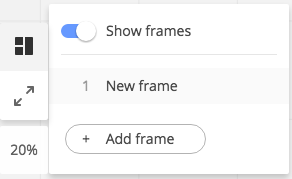
       Lower down the tool menu, Frames [F] (which I am quite impressed with as mentioned on my overview). This tool allows you to create “pages” or “views” within the whiteboard. You can then navigate between them using the arrow keys (only when in Frames). When using this tool, you can select the size and drag it to incorporate whatever you like to appear in the ‘view’.
       Fullscreen does just that. No bells. No whistles. But quite useful none the less, especially when displaying this on an actual whiteboard.
      The last tool is the Minimap [Z], or zoom tool. This essentially allows you to return to the default zoom or size of the document, as well as showing a mini-map of your board (remembering that it could be gigantic on an infinite whiteboard!).

    Inserting Media

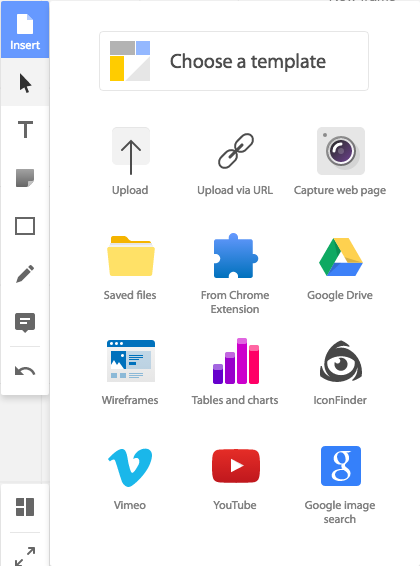
    The other tool is at the top of the whole list. It allows you to do a range of different things:

    • Choose a template from a range of different layouts and examples of what Realtimeboard can be used for.
    • Uploading images, files from your local computer.
    • Uploading images etc from a URL.
    • Screenshot of a webpage.
    • Recently uploaded files that you’ve already uploaded.
    • Files from the Realtimeboard Chrome Browser Extension.
    • Files from your Google Drive (if you have connected your account in settings).
    • Wireframes are great! They are a quick-select library of templates or layouts which are quick and easy to add into your board. See below for the examples.
    • Tables and Charts to give a quick visual of data or statistics is built into this app nicely.
    • IconFinder allows you to add a selection of icons to make your board more visually rich.
    • Vimeo allows you to select video from Vimeo.com.
    • Adding videos from YouTube.
    • Add images from Google Image Search.


    Top Right

    Once again, Realtimeboard have been smart in keeping the same kind of features they offer in the same location as Google Apps. In the top right, includes a Share button to add ‘viewers’ or ‘editors’ and ‘collaborators’. You can invite people using their email addresses, and you can set the level of privacy, from ‘Can View’, to ‘Can Comment’, and ‘Can Edit’. You can also get a ‘Public’ link that allows you to easily share it out to everyone.

    Next to the share button are the ‘Comments’ that have been made, all available in one place.

    The Information button gives you quick links to feature pages of Realtimeboard. These are not related to the document.

    The Search button does just that; searches your board for a given word or phrase.

    Other Features

    The only other feature is key to real-time collaboration with others, and that is the Chat Feature in the bottom right corner. Video Chat requires a premium account, but screensharing appears to be available – although I have yet to try this. I can imagine this might be quite useful for view only collaborators.

    The other great feature of Realtimeboard is that it automatically saves, just like Google Apps.

    3. Creating Content

    Adding Text
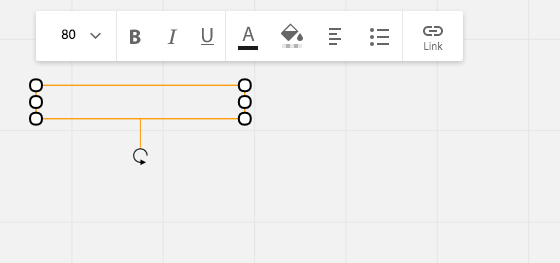
    One of the most common tasks you’ll want to do is adding text.

    1. Select the Text tool [T]
    2. Click on the board where you want the text to start.
    3. Start typing…

    As with most text tools, there are a number of formatting tools for use. From left to right;

    • You can choose the font size
    • Set the text as Bold, Italic, or Underlined, or a combination of all three.
    • Change the font colour, or the Fill colour. The fill colour sets the background of the text box to the colour you select.
    • Set the alignment of the text within the box, from left, centre, or right.
    • Create a bulleted list.
    • Create a link.

    Modifying Objects

    With all the objects placed on the board, the orange outline shows the object that is selected. This goes away when another object is selected, or you click off that object (or press Esc).
    The white circles around the outside of the selection allow you to change the dimensions of the box by clicking and dragging them in the appropriate direction. The corner circles allow for diagonal adjustments, and with text boxes, or if you hold down shift as you drag, these will keep the proportions as you adjust them. The circles in the middle of each outline allows for adjustment in either the horizontal or vertical direction only.
    The arrow on the end of a looped three-quarter circle allows you to rotate the object through 360 degrees.


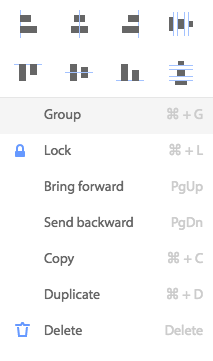
    If you right click on an object, there is a drop down menu that will appear with a range of options. These are different depending on the type of object. Most of them however include the following tools:
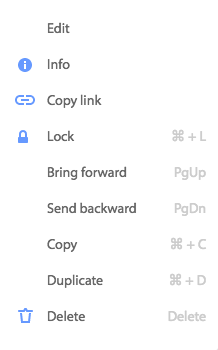
     

    Right click menu on any object

     Right click menu on any image  

    Right click menu when multiple objects are selected (using Shift)

    Holding down Shift as you click on different objects allows you to select multiple objects at once. Right clicking on these selected object then allows you to group and/or align objects together, as well as other functions.

    The key menu items I use from these are definitely the ‘Bring forward’ function, or the ‘Send backward’, which allows me to put things behind or in front of other things, particularly important when adding shapes and text to work in with each other.


    Examples

    I’m sure you’ll get the hang of it. Below I’ve just put up some examples of the content our class is currently experiencing through the Keeping Ourselves Safe programme run by the New Zealand Police. I spent a bit of time after our last session going through and adding a bit of flare to the content, more to show what is possible. I’ve included a few notes about how each was created.

    Example 1

    • Square shape, dragged to rectangle, filled with black.
    • Text, text colour changed to white.
    • Text, header box given a ‘pink’ fill, text colour to white.
    • Same pink colour for down arrow (Shape).

    Example 2

    • Square shape made into rectangle, thick border, purple/blue (custom colour)
    • 4x text boxes for each numbered point. Bold first line. Examples unbolded.
    • Text header, given same fill colour as border of square. White text colour changed.
    • Post-it Note added to right hand space. Font changed on note to ‘handwritten’.

    Example 3

    • Star Shape, Yellow Fill.
    • Star shape (small), orange fill, duplicated 4x.
    • 4x text box next to each small star.
    • STAR heading. Rotated 90 degrees. Bold text.
    • S.T.A.R, bold first letter. Bring to front over top of Star shape.

    Each of these examples look like a Powerpoint slide, but these are just the tip of the iceberg of how you can create content, and then add to it to make it visually impactual for your class. Adding in frames allows you to present it like a slideshow, or simply use the Pan tool [H] to move around the content. Each of these three examples exist on the one Realtimeboard, and are visually linked by arrows that viewers can follow the lesson progression as we worked through it.

    Right. That should be enough to get your feet wet. I’m sure that you’ll get the hang of it in no time, and begin creating a variety of creative and amazing content that will engage and inspire your students.

  • Realtimeboard: The Online Whiteboard for Teachers

    So you need some whiteboard software?

    Basically, there is software that is out there that mimics a whiteboard.

    Then there’s Realtimeboard.

    Online, creative, systematic, intuitive, custom, automatic, flexible. All the things you want in many software apps. But without adding so many options that it wipes out any function.

    I’ve been using Realtimeboard for a while now, but was always limited by their “3 board for free” policy, where free account users could only create three ‘boards’. Being that I would probably prefer to have one board for each subject, or one board for each topic, or even one board per lesson, the 3 board for free policy wasn’t really going to work.

    Recently, there has been a big push (even by Apple) for schools to ‘prove’ that they are a school, in order to offer educational packages to certified education institutions. Realtimeboard recently created a ‘education’ account that educators could sign up for. Their education package includes essentially their premium features, for the free package price. You can’t complain about that!

    Features

    Six-hats

    Below are some of the features that make Realtimeboard my new app of choice:

    Online

    If you want your app to be successful, it needs to be online. No question about it. People need to be able to access it on any computer, or even, any device; phones, tablets, netbook, notebook, laptop, or desktop computer.

    Realtimeboard is exactly that. It runs from the website, realtimeboard.com, much like Google Docs does, or WordPress. And like those, it has a dashboard that you’re taken to when you log in, with a grid or list view of your ‘boards’. As mentioned, the free account allows you to create only three boards, however, with the Education or Premium plan you can create as many as you like.

    Sharing

    To spread the use of your app, there is one thing above all else that will do that. The ability to share. Google does this seamlessly with their host of apps, all tying into Gmail and user contacts.

    Likewise, Realtimeboard allows you to send your board to any email address to share it. You can set the privacy to be view only or edit – though I suspect that such users may be required to sign up to the Realtimeboard service as well – which is how they spread their product.

    Sharing, in turn, also leads to collaboration, and is a key buzzword with anyone talking about technology and teaching together.

    Google Drive

    Integrating with a larger company’s product is a must. Realtimeboard not only allows you to sign up to its services using a Google Account, but then allows you to link with your Google Drive, and use your existing Google contacts list. This makes sharing boards a lot easier, especially with those on the same domain or those who also use Google Apps (which is most teachers these days). Add to that the fact that this will also work for students on Chromebooks, and it makes Realtimeboard an incredibly powerful tool.

    Web App on Chrome

    So more and more people are using Chrome, and people are discovering that they can add Web Apps to the home screen. Realtimeboard also does this, as well as having a Google Extension that users can add to quickly copy content from webpages into a board of their choice in Realtimeboard.

    The web app itself is little more than a link to Realtimeboard.com, but it sits nicely next to your Google Apps to remind you that it’s there, waiting to be of service!

    Templates

    With Realtimeboard, you can create a blank board, or use one of numerous templates which come pre-built with different layouts, different features, and different looks and feels. With that said, I mostly use a blank template to begin with, but in time, I can see the benefit of the templates if you have a specific learning module that requires one of the layouts seen in a template.

    Presentation

    Using the ‘Frames’ mode, users can use a frame to show a progression, turning Realtimeboard into a powerful presentation tool, much like Prezi or Impress.js. Each day in a series of lessons, or each lesson in a unit over the course of a term could be ‘framed’ up and put into a selective order. This makes it very flexible and usable for more than just keeping notes, or jotting down brainstorms.

    More

    As I say, I have only just started paddling in the pool of possibilities with this app. There is no doubt a range of uses and applications for it, both in the classroom as teachers, but also for students.

    So go ahead and get signed up. Get using it. Explore a new realm of possibilities in real time.


    Keep an eye out for an upcoming Check out my post on this site for how to use Realtimeboard, with real screenshots of the different tools and functions that the app offers.

  • The Collaborative Classroom

    The Collaborative Classroom

    Teaching environments and modern ways of reinventing knowledge.

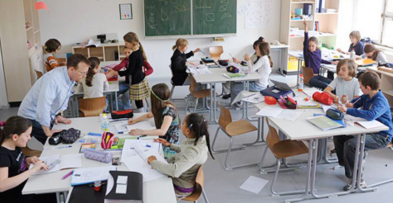
    The silent classroom is a thing of the past. Long days at your desk, all facing north, with the teacher’s desk aligned in the opposite direction at the front have been relegated to the storage cupboard along with the typewriter and cassette tape.

    Instead, the class is a buzz. Students, while individual and unique, are working together to achieve a common goal. The key competencies of ‘Relating to Others’ and ‘Participating and Contributing’ both get ticks in their boxes. Motivated by their own choice, students are inquiring into the affects of bees or lack thereof on the environment.

    The Collaborative Classroom has come about to closely align with ‘Modern Learning Environments (MLE), and seeks to align the physical aspects of the classroom environment with the collaborative philosophy of today’s education standards. It is one thing to get students to work together, to have collaborative practises, to have a teamwork based curriculum, but if all the classroom isn’t set up for students to work together, then they won’t. Certain aspects of the ‘Collaborative Classroom’ leads students naturally to work together.

    But with the environment there needs to be shifts in the teaching that allows students to work together, to search, struggle, challenge, and extend each other, and hopefully, grow a deeper understanding in the topic, their peers, and themselves. In essence, the teaching environment leads to modern ways of reinventing the way we acquire knowledge.

    I do not think there are many modern day teachers who don’t incorporate some collaborative tasks into their daily programme. We are constantly reminded of the value of strategies like ‘Think, Pair, Share’ and ‘Reading Jigsaw’. Certainly, having recently gone through training college, the idea of ‘group work’ and collaboration are well ingrained in the pedagogy of how we were taught to teach.

    Now there is a move to ensure that such activity is not only expected, it flourishes and happens naturally purely because of the classroom layout. As this Government rolls out a selection of funds for schools to ‘modernise’ their learning environments, the collaborative classroom is immediately considered as the way forward. Larger open spaces which are customisable are favoured for this, as different tasks require different needs.

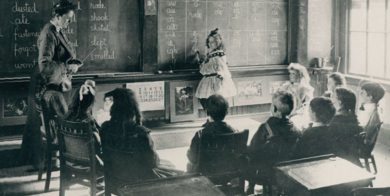
    1900


    Working in groups is not a new thing. As we can see in this old classroom photo, whilst individual desks are set apart, all facing the front, we can see the children of the class in a circle, participating in a lesson. Everyone doing the same thing so that they all left school fitting in a particular box was the aim.

    1990

    In the 1990’s, desks were somewhat modernised, along with individual trays that have multiple uses. Large, often bulky ‘personal computers’ were all the range, and it wasn’t uncommon for each class to have at least one that sat in a corner, just waiting to be played with during a wet lunch time, or if you were lucky, publish a piece of writing.

    The introduction of a mat area also became popular, inviting students in closer to see details, but also participate in a lesson that was separate from the daily grind of staying in one place all the time. For the first time we see a dedicated wide open space in the classroom.

    2000

    Enter the year 2000, turn of the century, and educators are looking for ways to encourage student talk, real life learning, and discourse in the classroom. But without a budget, schools had to use what they had. Individual desks were kept, but placed into groups. Each child would still have their belongings, but they would also be part of a group to work with, discuss ideas, and work together as a team.

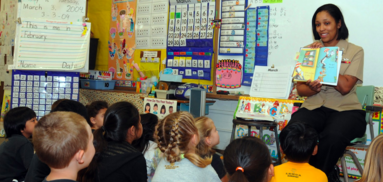
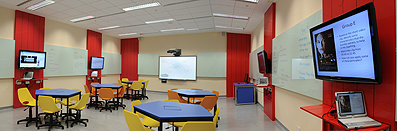
    It is around this time that the idea of a collaborative classroom came into play. Hubs of tables fill wide open space. The clutter is generally gone, but there is space for learning to happen. The walls are adorned with linked up screens that can be viewed from anywhere in the room.

    Roles and Relationships

    The role of both the student and the teacher has changed along with the physical space. In the 1900’s, the role of the teacher was that of a preacher. The fount of knowledge to fill the empty minds of the students. Repetition, repetition, and repetition was the key to learning, and if you didn’t get it first time, you’d keep doing it until you got it right.

    Take this through to today, we have a teacher who is a facilitator for learning. They pose questions that challenge and encourage wonderment. They inspire and engage. Students are the driving force for learning. They pick up an idea and take it further in the direction they want to take it. They work together to co-construct their success criteria, and figure out the how themselves. They rely not on the teacher for information, but on their own ability to go and find out. They are both collaborative, but independent, and the balance of these happens seamlessly. In an article written well before it’s time (1990), Tinzmann, MB et al. state that

    Effective communication and collaboration are essential to becoming a successful learner. It is primarily through dialogue and examining different perspectives that students become knowledgeable, strategic, self-determined, and empathetic. Moreover, involving students in real-world tasks and linking new information to prior knowledge requires effective communication and collaboration among teachers, students, and others.”

    The environment is only one part of the Collaborative Classroom. What is more important is the learning going on inside it. Rebecca Alber states:

    Learning, and higher-level learning such as synthesising information from several documents or analysing scientific data, can hit much deeper when done collaboratively. Let’s not forget Lev Vygotsky and his educational theory that proposes learning as a social process. And if he were alive today, he would most likely agree with the saying, Two minds are better than one. He might even add, “Better yet, how about three or four?”   

    It doesn’t matter if you are stuck in a 1960’s classroom with cupboards and storage, old flip-top lidded desks, and steel framed chairs; the way you go about teaching (or facilitating learning) is key.


    Is it any wonder then why the subtitle of this article spells out Teamwork with each first letter?

    Related Reading

    1. Tinzmann, MB et al. “What is the collaborative classroom.” Proceedings of NCREL (1990).
    2. “Deeper Learning: A Collaborative Classroom Is Key | Edutopia.” 2012. 29 Sep. 2015 http://www.edutopia.org/blog/deeper-learning-collaboration-key-rebecca-alber
  • Google Docs for Collaboration

    Using Google docs to create documents is easy. It especially works well when a document is being created by a small team, with each user the document is shared with able to make suggestions or edits.

    Create a New Document

    Open up Google Docs (http://docs.google.com)
    Click on the plus + in the bottom right corner, or open an existing document.

    GD-1

    Make sure that you change the name of the document! Click on the name of the document and rename it. Click OK to save the name change.GD-3

    Sharing Google Docs

    The first thing you will want to do (possibly) is share the document with others. To do this simply click on the blue share button in the top right corner.

    GD-4

    Then just simply enter in the email addresses of those who you wish to share this document with.

    GD-5

    You can change these permissions after you add them by clicking on the words below the “People” input box which says “Shared with……………”

    You are always the owner of any document that you create.
    Can edit are able to completely change the document with the same level as owners
    Can comment allows people to make comments on the side of the document, but are unable to change anything in the document itself.
    Can view allows people to see the document, but not make any comments or edits.

    Some common uses for these roles:

    Can edit: Another teacher that you are collaborating with.
    Can comment: Sharing a unit plan with another education professional who you want their feedback on. This may also include BLENZ Teachers, RTLB, Van Asch Teachers etc…
    Can view: Students who have logged on and you want to show them an assignment that they need to work on the Chromebooks with.

    Sharing is available for ANY Google Doc, not just the Unit Template.

    Commenting and Collaborating

    The great thing about Google Docs is the ability for others to contribute and edit a document. Doing this can take different forms depending on what you want to do.
    On the right hand side, below the share button is the style of ‘editing’ that you can use.

    GD-7

    • Editing: This is for editing the document in place. This is the default editing mode and makes the changes to the document.
    • Suggesting: This is very useful when collaborating with others. Using this mode, users can make suggestions of additions or changes to the document. Upon doing this, it puts it in a different colour, and puts a ‘comment’ box to the right of the document. It also shows an “Accept” or “Reject” tick box system, in which the other collaborators can either accept the ‘suggestions’ or remove them. This is very useful as it shows up in a different colour, and also allows for draft entries, especially for when you’re not sure or want to put forward an idea for others.
    • Viewing: Quite simply, this removes all editing capabilities, and just allows you to read and print the document.

    GD-8In addition to this, if you have a “Can edit” or “Can comment” status when the document is shared with you, there is a Comments section next to the Share button.
    These allow you to leave a comment for the other editors and commentators that you have shared the document with, or with documents that others have shared with you.
    Comments can be applied to specific parts of the document by first selecting the text, and then clicking on Comments → Add a comment as above.

    Revision History

    The really important part of Google Docs is that it keeps EVERY change you make. It saves automatically, and keeps a record of those saves.

    This means that any changes you make are kept in a log.

    GD-9Click on See revision history. A window will show up on the right which will have a list of major changes and save dates. You can click through these to see the changes.
    If you need a more detailed view of specific changes, you can click on ‘Show more detailed revisions’.
    This will show just about every auto-save in the history of the document.
    Clicking on each revision will restore that version. This allows you to go back to a previous edit of the document, if you or any of your collaborators have made a mistake you wish to go back and remedy.

    Other than that, Google Docs pretty much operates as any other Word Processor. Feel free to explore the menu’s to find out more. Google’s Help menu has a lot of good information about how to use it.