Tag: Google Docs

  • Lockdown Learning – How much is too much?

    It seems that not a day goes by without some company out there offering free access to their product until July. Don’t get me wrong, I know that for the most part they’re doing this in all good faith.

    But the reality is, the market is getting saturated at the moment as teachers, parents, and children all prepare for this thing called remote learning.

    No doubt, many of these tools, programmes, and software will all help provide learning opportunities for your students while they’re stuck at home.

    But maybe we need to just take a step back and think about this for a bit.

    Step back

    The world faces a pandemic, of the likes none of us have seen before. The Spanish plague at the end of WWI is listed as the last time this happened. Everyone is affected by it, and everyone reacts in different ways. For most, being cooped up inside is stressful enough in itself, let alone the threat of a virus. Students and children are no different. And yet, for some reason, we’re expecting that while they’re at home, they focus on furthering their education?

    At this stage, we are on lockdown for four weeks. Many of us know this will be a minimum, with many of us thinking it will likely be 6 weeks, if not more. Yet we are putting pressure on teachers to get their whole class online, prepare a programme, and develop competence in a range of different software, apps, or systems, many of which we’ve never used before. All this compounds the stress teachers are feeling at the moment to do the “right thing”.

    Then you have the education elite, specialists, and experts, who are all asking the big questions like whether your plans for online learning and remote tasks in the digital realm align with the latest pedagogy and add any educational benefits to our learners. Suddenly, I’m not so certain of myself, my abilities as a teacher in these times, despite the fact I’m one of the more technologically inept teachers out there. The reality remains though, that these are very big questions for what will hopefully be a very short amount of time. If (God forbid) this lockdown heads into several months, then we can begin to contemplate those questions further.

    Routine

    I know that for many people, routine is important. It’s why much of my class programme follows a regular schedule when we’re at school. And during this time where there is so much uncertainty, providing my students with that same routine becomes even more important.

    So where does this leave me?

    How Much is Too Much

    Well. I return to the question at the top. How much is too much?
    Let’s face it; students are not in our care for the six hours we usually have. It is unreasonable to expect that we get six hours of “work” out of them. Therefore, we shouldn’t be providing six hours of work. Less is more.

    We don’t need to go out and use every and any software and system out there. Keep it simple. Less is more. In the four days I had with my class between the closure of schools on Tuesday 24 March through to Friday 27 March where “School Holidays” were brought forward to, I managed to continue with a basic programme with my class, of which 10 students regularly participated in. During that time I made the learning work using five main apps. Five. That’s it. Less is more.

    1. Google Classroom: Everything went through this. I scheduled material to be released at different times of the day so that students didn’t rush ahead and get everything done in an hour and then be mucking around for the rest of the day.
    2. Google Docs: Students are already used to how this work. I turned chat back on for everyone, and this allowed us to collaborate on a topic brainstorm that we continued from the Monday. Add to this, I put our a daily advanced organiser or “Day Overview” for the students which had the times and activities they had to do that day. This also helped me to schedule things on Google Classroom at the right times.
    3. Youtube: I pre-recorded a series of videos, from reading chapters of our class story to mini-lessons around Reading strategies. I did not dabble in any live streaming, and didn’t really see the need to.
    4. GoNoodle: These are a bunch of videos that I’d already been using in class for various uses. In this remote learning phase, I used GoNoodle for fitness activities, and for mindfulness sessions.
    5. Google Meet: This is a video conferencing software which Google has made available to all educators during this time. This is really the only one I hadn’t used before, but works quite well, along the same lines as Zoom which has become popular lately. We used this once on Friday to touch base with each other. We are also having a Board meeting with it this week!

    That’s it. That’s all I used, and all I felt I needed to use. Three of these apps, the students had already had experience with. Google Classroom was relatively easy to pick up, as was Google Meet.

    New Apps, New Opportunities

    But could signing up for all these flash apps and programmes make it better? Video conferencing, collaborative whiteboards and presentation productions all sound brilliant. They could add another level of connection with our students that we’ve yet to experience, and maybe they will make this whole teaching from home thing a lot easier for teachers. They might enrich the learning, and make better use of the wide world of technology that we currently have at our disposal. What if they have the answer to our problems we’re running into with delivering remote learning? What if they revolutionise how we teach? What if there’s something they do that we hadn’t considered before. We don’t know what we don’t know.

    Or maybe they will just complicate something which at its very essence, needs to be as straightforward as possible. For two reasons. One: because it needs to be realistic and manageable for teachers in order for it to be sustainable if this lockdown lasts longer than 4 weeks. And two: because it needs to remain accessible for students who may not have much experience using these new apps, and may not have much ICT support at home if things go wrong. As it was, the hardest things my students struggled with were those apps that we hadn’t used in class much – Google Classroom, and Google Meet.

    Final Thoughts

    So if you’re at home, getting bombarded with emails of various systems who are now offering their latest product at free costs for the next two months, or you see posts from educational experts imploring you to consider the learning benefits and pedagogy behind your learning. You don’t actually need all the bells and whistles just because they’ve been made free to use. Remember: Be brave. Do less. It’s a mantra I use when teaching in my actual classroom, and I stick by it when thinking about this remote learning. Make it sustainable for you – this means set up a system that you’re comfortable with and works for you (not you working for it!). Make it accessible for your students – this means using apps and software that students can not only access, but are familiar with so that there is less stress around getting it working or not knowing what to do. Stick with what you know. Stick with what your students know.

    Less is more.

    Stay safe.
  • Using Google Drive instead of My Documents

    Sometimes old habits die hard. Sometimes default settings also can be a bit of a pain. Sometimes you can set up all the synchronisation you want, but files will still get lost somewhere in the blue void.

    That’s my experience with Windows in schools. Microsoft does a very good job for the most part, but it has always been a bit of a sticking point when a teacher arrives at work on Monday and suddenly their work from the weekend goes missing. Or they’ve logged in on another computer and suddenly don’t have all the files they thought they did.

    Firstly, before we even look into using Google Drive, I want to say one thing. Back up your files.

    Then back them up again. Put them on a USB or portable storage. Take them home. Back them up again. Just in case.

    I make a habit of doing it every year at the end of the year. Some would even suggest doing it more regularly. Every term, or every month. However, now that I’m using Google Drive to store my files, I’m finding that the need to back up is much, much less than if I were purely relying on Windows and My Documents synchronisation.

    Google Drive

    Okay. So what is this amazing thing called Google Drive?

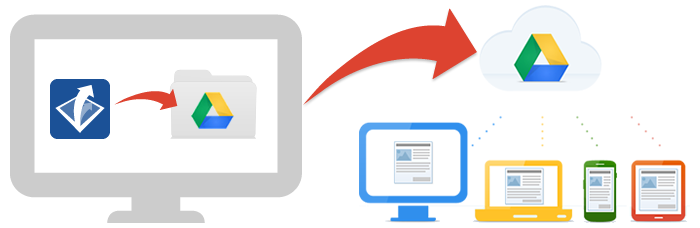
    Basically it is a server of all your files on the interweb. In a cloud some people say. It’s a USB stick, except instead of plugging it in, you simply log in online. This image below gives you an idea of how it works.

    All your files, uploaded to Drive, available on all your devices. Essentially we are setting up one big backup each time we make or create or edit or move any document in ‘My Documents’. And what’s more, space has just become unlimited with Google Apps for Education (#GAFE)

    Find out more about using Google Drive here: www.google.co.nz/drive

    From here you can click on  and create a new Google Doc, Google Sheet, Google Slide, or Create Folders to store your documents in, just as you would in My Documents.
    The Incoming tab will display all your shared files, along with any files that have been shared with you.

    The Recent tab displays the most recent files you have created or opened and worked on.

    In the Starred tab, you can see any files that you have starred (just like emails that you ‘star’ in Gmail)

    Bin is where all your deleted files are kept just in case.

    Searching and Finding

    Remember; Google is a search engine first and foremost. This means they can apply the same search functions to your documents as they can to the entire world wide web.

    At the top of the Drive home page (drive.google.com), or the Docs home page (docs.google.com), is a search box. This can search through any document you have opened or put into your drive.

    Do not forget you can use the Incoming and Recent tabs to help with finding documents.

    Integrating Google Drive with Windows

    There is a great program for Google Drive which creates a folder on your computer for your Google Drive documents. This then syncs up with your Google Drive on the internet.

    ANY file can be put onto Google Drive. It’s not just limited to Google Docs. This includes old planning files, PDF’s, images and photos of your class, worksheets, and other resources.

    1. Go to http://www.google.co.nz/drive/download/ and click on Download → Mac and PC.
    2. Once it’s downloaded open it and install with the preset default options.
    3. It will require you to sign in at some point.
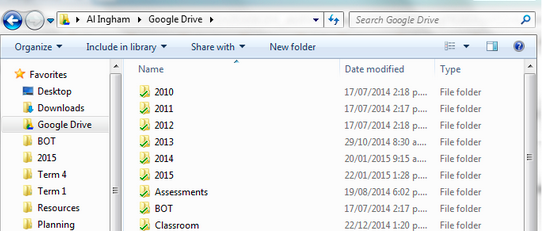
    4. You will now see a Google Drive option in your “Favourites” bar when you go to Windows Explorer (Windows+E).
      Here you can see I have copied all my teaching files over from My Documents to Google Drive.
      When I save a file, instead of saving it in My Documents, I save it to the Google Drive folder.
    5. In Libraries (down bottom left of the picture above), click on Documents


    6. You will see a bar at the top of the window. Click on Includes: 2 locations
      (Note: Mine says 3, yours may have a different number)
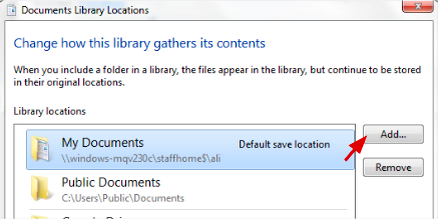
    7. On the right of the pop up box, click on Add.
    8. Find your Google Drive folder (should still be on the right in your favourites) and click on Include folder.
    9. You should now have your Google Drive folder showing up as a location.
    10. Right click on Google Drive and select “Set as default save location
      I then right click on it and select “Move Up” until it is at the top. This means when you click on “Documents”, your Google Drive location will show up at the top.
    11. Click on OK. And now you are all set up and ready to go!

    Tips and Tricks

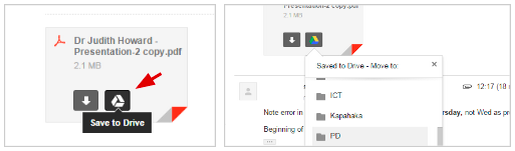
    1. You can save attachments straight from emails to your drive. Just click on the Drive icon that shows over the attachment in Gmail. Then you can choose which folder to put it in afterwards, and open it in your Google Drive.
    2. Use the little arrow at the end of the Google Search bar to filter your search results before you search. Maybe you can’t remember the title of the document, but you can remember that it was shared by a particular person or was a PDF. You can select these first. This arrow also works in Docs, Gmail, and all the other Google Apps.
  • Creating Unit Templates in Google Docs


    One of the big shifts forward in our school this year has been the introduction of Google Docs, Google Drive, and collaborating. This also coincides with a drive and a passion to integrate our unit plans and follow the “Less is More” policy (especially in regards to paper usage!). With a Term 4 being a huge success, we are stepping out into 2015 with our best foot forward.

    Part of my role as the “IT Guru” (Computer Wiz, TechGeek, whatever-you-want-to-call-me) is to make sure that

    1. The introduction of new technology happens seamlessly. This means having things up and running in the background before unleashing it to the general populous.
    2. That teachers are introduced to the new technology in a friendly and non-threatening way so as to learn, engage, and use it effectively to enhance their practise.

    Before running my tutorial on using Google Docs and Google Drive, I had to make sure things were set up and ready to be used in the easiest way possible. Ease of use for the end user is high on my list for anything I’ve ever done in regards to IT and teachers. If it is made easy for them, then they’re more likely to want to use it.

    One of the keys to this, was first making a template for the collaborative and integrated unit plan. This would enable other teachers to make a unit plan using a default (and schoolwide) template.

    1. Create a document in Google Docs by clicking on the blue plus (+) sign.
    2. Rename your new file by clicking on the title. Call it “Unit Plan Template” or something similar.
    3. Make your template for the minimal outline of the template. Add in the text, colours, stylings to build up the template with the default text and features. These should be things that are common across ALL unit plans; not just yours. For instance: instead of having “Term 1, 2015”, have “Term X, 20XX” so that others that use the template won’t forget to change the date.
    4. The next part is a little confusing. I suspect possibly because either Google has moved away from using templates, or they’re re-developing how it is to be integrated. Anyhow, this is how you make your template available to others in your organisation.
      You will need to go to “File > New > From template…“. This should load up the template gallery in a new tab.
    5. On the far right you will see the text “Submit a template“.
    6. This will bring up a standard form for you to submit your own.
    7. Click on “Choose from your Google Docs” and find your document “Unit Plan Template”. You can search for it in the search box at the top, or scroll through your recent documents.
    8. You can choose whether to enter a description. This could be quite useful if you’re planning on making a lot of different templates.
    9. You can decide on your own category. I put mine under “Planners”.
    10. The rest I left as is, but obviously you can set a second category if it applies, and change the language should you need to.
    11. Click on “Submit template“.
    12. It may take a while to appear in your list, as it has to be checked that it will work. I’ve never had any issues with this process. Usually within 5 minutes it will be made available to use.
    13. It should appear under your organisations tab for templates. It will also be available under “My Templates“.
    14. It will appear in this place for all the teachers in your organisation, and so they will be able to follow the process of clicking “File > New> From template…” and then clicking on the “Use this template” button.
    15. Once I’ve done that, you’ll see that the document is still in your Google Docs and Google Drive. I like to create a folder called “Templates” in Google Drive and drag the file into it. That way it doesn’t get in the way and is nice and organised. It also means all my templates will be in one spot on my Google Drive. The other benefit of having the file still, is that when you edit the template file “Unit Plan Template“, the change will automatically update for the Template Gallery. Useful!
    16. And you’re done!


  • Google Docs for Collaboration

    Using Google docs to create documents is easy. It especially works well when a document is being created by a small team, with each user the document is shared with able to make suggestions or edits.

    Create a New Document

    Open up Google Docs (http://docs.google.com)
    Click on the plus + in the bottom right corner, or open an existing document.

    GD-1

    Make sure that you change the name of the document! Click on the name of the document and rename it. Click OK to save the name change.GD-3

    Sharing Google Docs

    The first thing you will want to do (possibly) is share the document with others. To do this simply click on the blue share button in the top right corner.

    GD-4

    Then just simply enter in the email addresses of those who you wish to share this document with.

    GD-5

    You can change these permissions after you add them by clicking on the words below the “People” input box which says “Shared with……………”

    You are always the owner of any document that you create.
    Can edit are able to completely change the document with the same level as owners
    Can comment allows people to make comments on the side of the document, but are unable to change anything in the document itself.
    Can view allows people to see the document, but not make any comments or edits.

    Some common uses for these roles:

    Can edit: Another teacher that you are collaborating with.
    Can comment: Sharing a unit plan with another education professional who you want their feedback on. This may also include BLENZ Teachers, RTLB, Van Asch Teachers etc…
    Can view: Students who have logged on and you want to show them an assignment that they need to work on the Chromebooks with.

    Sharing is available for ANY Google Doc, not just the Unit Template.

    Commenting and Collaborating

    The great thing about Google Docs is the ability for others to contribute and edit a document. Doing this can take different forms depending on what you want to do.
    On the right hand side, below the share button is the style of ‘editing’ that you can use.

    GD-7

    • Editing: This is for editing the document in place. This is the default editing mode and makes the changes to the document.
    • Suggesting: This is very useful when collaborating with others. Using this mode, users can make suggestions of additions or changes to the document. Upon doing this, it puts it in a different colour, and puts a ‘comment’ box to the right of the document. It also shows an “Accept” or “Reject” tick box system, in which the other collaborators can either accept the ‘suggestions’ or remove them. This is very useful as it shows up in a different colour, and also allows for draft entries, especially for when you’re not sure or want to put forward an idea for others.
    • Viewing: Quite simply, this removes all editing capabilities, and just allows you to read and print the document.

    GD-8In addition to this, if you have a “Can edit” or “Can comment” status when the document is shared with you, there is a Comments section next to the Share button.
    These allow you to leave a comment for the other editors and commentators that you have shared the document with, or with documents that others have shared with you.
    Comments can be applied to specific parts of the document by first selecting the text, and then clicking on Comments → Add a comment as above.

    Revision History

    The really important part of Google Docs is that it keeps EVERY change you make. It saves automatically, and keeps a record of those saves.

    This means that any changes you make are kept in a log.

    GD-9Click on See revision history. A window will show up on the right which will have a list of major changes and save dates. You can click through these to see the changes.
    If you need a more detailed view of specific changes, you can click on ‘Show more detailed revisions’.
    This will show just about every auto-save in the history of the document.
    Clicking on each revision will restore that version. This allows you to go back to a previous edit of the document, if you or any of your collaborators have made a mistake you wish to go back and remedy.

    Other than that, Google Docs pretty much operates as any other Word Processor. Feel free to explore the menu’s to find out more. Google’s Help menu has a lot of good information about how to use it.