Tag: Google Drive

  • How to use Realtimeboard in the Classroom

    Yesterday I posted about Realtimeboard, an online whiteboard I have begun using in my class to collate and collect the work that we work on together.

    Today I plan to take you through the steps for getting started, making your first board and general use of the app. I’m sure that I won’t be able to cover everything that the app can do, but hope to give you enough of a start so that you can realise for yourself the power of this software and how you might start using it in your classroom.

    Step 1. Getting Started

    I am going to assume that you’ve managed to get yourself signed up, and hopefully have managed to get approved for an educator account. If not, I highly suggest that you do. Go to realtimeboard.com/education/ and fill in the form. They actually get back to you a lot sooner than they suggest.

    Once you have signed in, you’ll be greeted by your dashboard. You may get a “What’s New” as is customary these days with these kinds of apps.

    The dashboard is relatively straight forward. You have your created boards at the top, and some demo boards below.

    Clicking on the Google inspired blue “plus” circle will create your first board.

    Realtimeboard has done well to make this app resemble any of the native Google Apps, by including “Shared with me” and “Last Opened” menu filters on the left hand side.

    At the top right, there are account links and settings options.

    Click the plus to create a new board.


    Step 2. The Workspace

    Navigating

    The Realtimeboard workspace is essentially an infinite ‘canvas’ or board stretching out beyond the edges of the screen. There are a few, quick tips you’ll need to know for getting around.

    1. Using the mouse roller button, or doing two finger scroll on most trackpads these days will zoom in and out from your canvas. It zooms towards or away from the position of the mouse cursor on the screen.
    2. Clicking on the canvas and dragging allows you to move around the canvas at the current zoom rate.
    3. Clicking on an object selects that object and allows you to perform different operations with them.
    4. Double clicking will centre and zoom (in or out) to fit the selected object to the whole viewport.
    5. Arrow keys also allow you to move around the canvas
    6. Esc key exits from the current operation. If you are typing text, it will go back and show the selection of the text box. Pushing Esc again will deselect the textbox. Obviously, if you’ve only selected a shape, pushing Esc once will deselect it.

    Zooming in and out allows you to get right into the little details, as well as zoom out to see an overview of your board. Using these together, especially with frames mode creates great transition animations as the viewing screen zooms in and out to fit the screen.

    Top Left

    The top left, as with many Google Apps that Realtimeboard has mimicked, includes the Title & Document Name and a Home button to return you to the Dashboard.

    In addition, Realtimeboard offers an “Export” button, which allows users to save the board off in a range of different formats. This is incredibly useful for a number of reasons and uses, such as including the board in a different document, keeping an archived version of the board, or merely just backing up. It also allows you to save it straight to your Google Drive; if you have linked your account.

     

    Tools

    Realtimeboard includes all the tools you would expect to find in such an app. Each tool even has a shortcut key which is incredibly helpful for quickly changing tool. I’ve included these in square brackets.

      The pointer tool has two options. One is the standard Select tool [V], and the other is the hand, or Pan [H], which allows users to drag the viewport around the canvas. The select tool defaults to the hand tool when clicking on the canvas background instead of an object on the board.
      The Text tool [T] brings up a standard text cursor that users can use to create text boxes on the whiteboard using click and drag
    Hello Sticky Notes [N]! This is possibly one of the cooler tools that can be used to show key bits of information, or student’s ideas and suggestions. You can post one at a time, square or landscape, or create multiple notes at once. Great for writing down different student views from around the class!
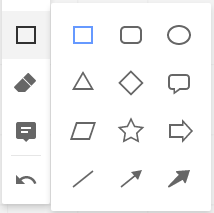
    It wouldn’t be a whiteboard without the Shape [S] tool. Gone are the days of teachers having to practise drawing perfect circles on their blackboard. Now, just select the shape and then click and drag it to the desired size on your canvas.

    You can also add text to shapes!

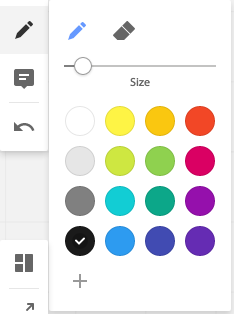
      The Pen [P] and Eraser [E] tools are great additions for the whiteboard. You can quickly select the desired size and then free hand draw or write onto the canvas with a selection of colours. While these are initially limited, you can also add your own custom colours from the spectrum.

    The eraser tool works really well, but only for lines drawn with the pen. It does not erase shapes for example.


    Comments [C] are integrated into Realtimeboard much like they are in Google Apps. You can even mention other collaborators directly. Like in Google Docs where you can assign comments to words or lines or sections, you can place comments on any part of the canvas.
       Undo [Ctrl+Z or Cmd+Z] is the most used tool, and it’s no surprise that the folk at Realtimeboard have built this into their app, along with the common shortcut people will be used to.
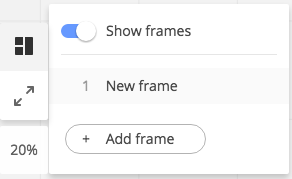
       Lower down the tool menu, Frames [F] (which I am quite impressed with as mentioned on my overview). This tool allows you to create “pages” or “views” within the whiteboard. You can then navigate between them using the arrow keys (only when in Frames). When using this tool, you can select the size and drag it to incorporate whatever you like to appear in the ‘view’.
       Fullscreen does just that. No bells. No whistles. But quite useful none the less, especially when displaying this on an actual whiteboard.
      The last tool is the Minimap [Z], or zoom tool. This essentially allows you to return to the default zoom or size of the document, as well as showing a mini-map of your board (remembering that it could be gigantic on an infinite whiteboard!).

    Inserting Media

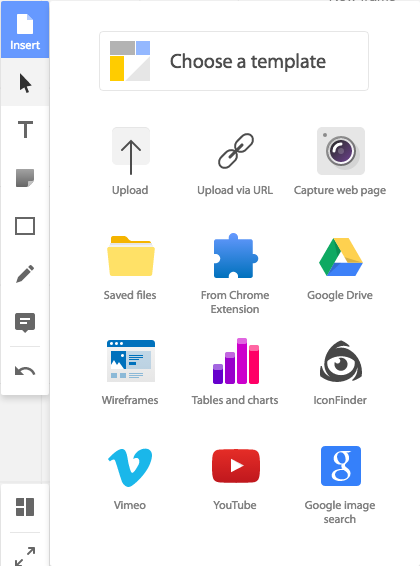
    The other tool is at the top of the whole list. It allows you to do a range of different things:

    • Choose a template from a range of different layouts and examples of what Realtimeboard can be used for.
    • Uploading images, files from your local computer.
    • Uploading images etc from a URL.
    • Screenshot of a webpage.
    • Recently uploaded files that you’ve already uploaded.
    • Files from the Realtimeboard Chrome Browser Extension.
    • Files from your Google Drive (if you have connected your account in settings).
    • Wireframes are great! They are a quick-select library of templates or layouts which are quick and easy to add into your board. See below for the examples.
    • Tables and Charts to give a quick visual of data or statistics is built into this app nicely.
    • IconFinder allows you to add a selection of icons to make your board more visually rich.
    • Vimeo allows you to select video from Vimeo.com.
    • Adding videos from YouTube.
    • Add images from Google Image Search.


    Top Right

    Once again, Realtimeboard have been smart in keeping the same kind of features they offer in the same location as Google Apps. In the top right, includes a Share button to add ‘viewers’ or ‘editors’ and ‘collaborators’. You can invite people using their email addresses, and you can set the level of privacy, from ‘Can View’, to ‘Can Comment’, and ‘Can Edit’. You can also get a ‘Public’ link that allows you to easily share it out to everyone.

    Next to the share button are the ‘Comments’ that have been made, all available in one place.

    The Information button gives you quick links to feature pages of Realtimeboard. These are not related to the document.

    The Search button does just that; searches your board for a given word or phrase.

    Other Features

    The only other feature is key to real-time collaboration with others, and that is the Chat Feature in the bottom right corner. Video Chat requires a premium account, but screensharing appears to be available – although I have yet to try this. I can imagine this might be quite useful for view only collaborators.

    The other great feature of Realtimeboard is that it automatically saves, just like Google Apps.

    3. Creating Content

    Adding Text
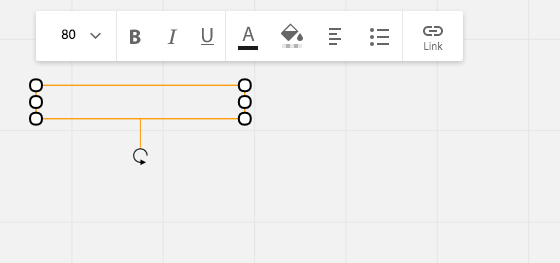
    One of the most common tasks you’ll want to do is adding text.

    1. Select the Text tool [T]
    2. Click on the board where you want the text to start.
    3. Start typing…

    As with most text tools, there are a number of formatting tools for use. From left to right;

    • You can choose the font size
    • Set the text as Bold, Italic, or Underlined, or a combination of all three.
    • Change the font colour, or the Fill colour. The fill colour sets the background of the text box to the colour you select.
    • Set the alignment of the text within the box, from left, centre, or right.
    • Create a bulleted list.
    • Create a link.

    Modifying Objects

    With all the objects placed on the board, the orange outline shows the object that is selected. This goes away when another object is selected, or you click off that object (or press Esc).
    The white circles around the outside of the selection allow you to change the dimensions of the box by clicking and dragging them in the appropriate direction. The corner circles allow for diagonal adjustments, and with text boxes, or if you hold down shift as you drag, these will keep the proportions as you adjust them. The circles in the middle of each outline allows for adjustment in either the horizontal or vertical direction only.
    The arrow on the end of a looped three-quarter circle allows you to rotate the object through 360 degrees.


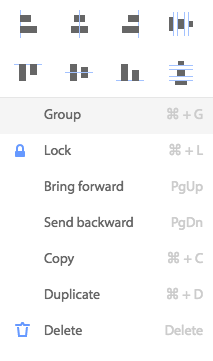
    If you right click on an object, there is a drop down menu that will appear with a range of options. These are different depending on the type of object. Most of them however include the following tools:
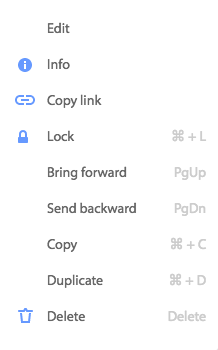
     

    Right click menu on any object

     Right click menu on any image  

    Right click menu when multiple objects are selected (using Shift)

    Holding down Shift as you click on different objects allows you to select multiple objects at once. Right clicking on these selected object then allows you to group and/or align objects together, as well as other functions.

    The key menu items I use from these are definitely the ‘Bring forward’ function, or the ‘Send backward’, which allows me to put things behind or in front of other things, particularly important when adding shapes and text to work in with each other.


    Examples

    I’m sure you’ll get the hang of it. Below I’ve just put up some examples of the content our class is currently experiencing through the Keeping Ourselves Safe programme run by the New Zealand Police. I spent a bit of time after our last session going through and adding a bit of flare to the content, more to show what is possible. I’ve included a few notes about how each was created.

    Example 1

    • Square shape, dragged to rectangle, filled with black.
    • Text, text colour changed to white.
    • Text, header box given a ‘pink’ fill, text colour to white.
    • Same pink colour for down arrow (Shape).

    Example 2

    • Square shape made into rectangle, thick border, purple/blue (custom colour)
    • 4x text boxes for each numbered point. Bold first line. Examples unbolded.
    • Text header, given same fill colour as border of square. White text colour changed.
    • Post-it Note added to right hand space. Font changed on note to ‘handwritten’.

    Example 3

    • Star Shape, Yellow Fill.
    • Star shape (small), orange fill, duplicated 4x.
    • 4x text box next to each small star.
    • STAR heading. Rotated 90 degrees. Bold text.
    • S.T.A.R, bold first letter. Bring to front over top of Star shape.

    Each of these examples look like a Powerpoint slide, but these are just the tip of the iceberg of how you can create content, and then add to it to make it visually impactual for your class. Adding in frames allows you to present it like a slideshow, or simply use the Pan tool [H] to move around the content. Each of these three examples exist on the one Realtimeboard, and are visually linked by arrows that viewers can follow the lesson progression as we worked through it.

    Right. That should be enough to get your feet wet. I’m sure that you’ll get the hang of it in no time, and begin creating a variety of creative and amazing content that will engage and inspire your students.

  • Google Drive vs. OneDrive

    Sorry. Did I say versus?

    I meant AND.

    About four years ago, our school made a shift to using Gmail as our email client. We’ve never looked back.

    This year, we began delving into Google Drive, and Google Docs as a staff. We moved our Documents from My Documents to our Google Drive without so much of a hitch. We developed an Integrated Unit Plan to use in Google Docs that we could share and collaborate with our colleagues.

    But three terms on, and the full extent of Google Apps has yet to be fully embraced.

    Why?

    Quite simply, it comes down to one thing.

    Familiarity.

    Change is hard. Change is often unwelcome. And unless that change demonstrates it is a better option to the point where you can’t do without it, reverting back to your old ways is almost inevitable.

    Unfortunately, Google Docs, Google Sheets, Google Slides can all be done without by teachers. All because of one thing.

    Microsoft Office

    Ever since its release, teachers (and other professionals) have begun using Microsoft Office for everything. I know myself, that I very rarely turn to any other solution when needing to use a word processor, layout, A4 print, or anything else.

    Now don’t get me wrong; I have made every effort to convert myself into a Google App user. I’ve used it in almost ever faucet of my teaching computer use, including analysis of data, collection of data, unit planning, weekly planning, student collaboration, and more.

    Obviously my use of Microsoft Office continued, with report templates, data sheets, and pre-existing templates being used by the school still in Word or Excel. Other teachers avoided Google Docs because of its limitations, because it looks and feels different to Word, and because they prefer to use what they know, rather than spend a lot of time converting over to Google Docs. And I can’t blame them at all either. It requires a lot of time tweaking, adjusting, moving, changing, to completely adopt Google Apps and have a perfectly working Google Doc rather than an existing Word version. (And yes, I’m well aware you can open a Word document in Google Docs, but it doesn’t always get it right, and it always tries to save it as a Google Doc afterwards.

    The Switchback

    There is a new player on the court.

    It’s name?

    OneNote.

    It’s being heralded as a game changer and I can instantly see why.

    Yes, I’ve used Evernote. Then it became too mainstream and clunky with its high-brow graphics. It began doing too much, like food reviews and becoming social.

    Google’s version, Google Keep, is little more than a gimmick, imitating post-it notes. Don’t get me wrong; teacher’s do love a good stack of post-it notes. But guaranteed, when the rubber hits the road, and a teacher has to run out of the class in a fire; are they going to save the stack of post-it notes, or grab their planning folder and diary?

    Microsoft OneNote has that potential to become the central hub of everything a teacher does. Much like a ringbinder, I can see it becoming a filing cabinet, a student profile book, a manila folder, and a clearfile all in one.

    And one thing that makes OneNote a game changer is it’s ability to sync on mobile devices and share with colleagues. However, to do this, it needs OneDrive activated. Obviously Google and Microsoft are at war, and Microsoft won’t allow OneNote to sync using Google Drive instead of OneDrive.

    Two Peas in a Pod


    So suddenly we find ourselves wanting to get OneDrive set up. Both OneDrive and Google Apps are essentially ‘free’ for Education. So we have access to both.

    Initially, it would be fine just to use OneDrive as a means to an end, if only just to run OneNote it would be worth it.

    However, my thinking is, why not use all of Office 365, Microsoft’s answer to Google Apps. If teachers are sticking to using Word because of familiarity, why not
    just extend this to Office 365 and get all the benefits of Google Docs, but in a familiar setting. Perfect.

    Except we have Google Drive all set up. We have Google Doc templates. I’ve spent all year changing myself over to Google. And what’s more, our school has just invested in providing Chromebooks for use by our senior students, which all run off Google Apps.

    So teachers will still need Google Drive, and Google Apps.

    Or vs. And

    In most battles, it’s always an “or” that is used. Holden OR Ford. Marmite OR Vegemite. Rugby OR League. iPhone OR Samsung. Facebook OR Twitter. Microsoft OR Apple OR Google.

    However, in this case, because Google have nothing that even compares to OneNote, or the familiarity of Microsoft Office with Office365. But in the same sense, we definitely need to keep Google Drive and Google Apps. There is no way we should throw the baby out with the bathwater.

    So, at our school, we will be adopting an AND mindset.

    We will be using Google Apps and Microsoft Office 365. We will make use of Google Drive, and OneDrive. We will collaborate and share with students in Google Docs, and will organise ourselves through OneNote.

    Essentially, we will find ways that we can have the best of both worlds.

  • Moving Google Sites to a different Google Account

    ePortfolio on Google Site

    When I first thought of a way to gather all my evidence as online documents, rather than print outs and photocopies that gradually fill up a clearfile every year, I knew that Google Sites was going to be the way. It’s seemless link into Google Drive allows for me to create an “Evidence” folder, and then link to any document inside those folders. Using the Practising Teacher Criteria as a guide and a structure, I created folders inside the ‘Evidence’ folder, and began collating and sorting the evidence appropriately.

    However, at a NZEI cluster meeting where I shared this with other teachers in the area, many were concerned that hosting this on the school’s accounts would be problematic should one leave that school and move onto another. They mentioned that being able to somehow host this themselves on a personal site would be better.

    Luckily, this isn’t too hard to do, even if you’ve already set up your site on your school account like I had!

    Gmail or Google Account

    If you have your own personal Gmail account, you essentially already have Google Sites. Next to your account name, there is the Google Apps ‘9-square’ button. Clicking on this will open up the available apps, including Google Sites (hopefully!) If you haven’t already created your site, you can create a new one by clicking on the red ‘Create’ button.

    However, if you need to move your existing Google Site to your own domain, or your personal account, then you’ll need to complete the following steps. These can be found at E-Portfolio Apps. I have added to these to match the current Google Apps UI.


    Moving a Google Site out of an Educational Domain

    Steps to take place under the Educational Domain:
    1. To begin, open the site from within the educational domain.
    2. Go to More Actions () -> Manage Site.
    3. Select the “Sharing & Permissions” (or select this from the More Actions button in step 2).
    4. In the section titled “Invite people:” type in the email address of the personal account.
    5. Select “Is owner” from the drop down box. 
    6. Click Invite these people. This will send an email to the account listed above which will include a link to the sites current location under the ed domain.
    Steps to take place in the personal Google account:
    1. Open Google account and Gmail to view the link to the account we just shared.
    2. This will take you to the Ed Domain log in page. At the bottom of the sign in section there is an option to “Sign in with a different account”. Enter the personal account log in and password here.
      Note: To avoid all this, try opening the link in a different browser.
    3. Once you are logged in, open the site and click the More Actions –> Manage Site options.
    4. Select the General option.
    5. In the middle of this page, there is an option to Copy this Site. Select this. 
    6. Type in the site name and take note of the new URL which should read:
      http://sites.google.com/site/(new site name here)

    7. Click the button to Copy Site.

    To remove the school account as an owner of the site:

    Go to More Actions –> Sharing & Permissions and remove the school account as an owner of the site.
    Note: I didn’t do this as I still wanted to have access to this from my school account at this stage.
    At any point the school site can now be deleted.

    Instructions written by Heather Stafford, Technical Communications Instructor at E-Portfolio Apps. These have been edited by Al Ingham to match the current Google Apps layout in August 2015.


    Conclusion

    And that’s all there is to it. Easy ay!

    I even went a step further, using my alingham.com domain to create a sub-domain for my eportfolio to sit in. Editing this is relatively straight forward by following this article.

    It is also important to remember that, unless you want to go through all your evidence and black out student names, you should keep your eportfolio as ‘private’, and never publish the site as ‘public’. This means that any sub-domain you’ve created will simply point to the sites.google.com url, but the information will remain private to you and anyone that the site has been shared with.

  • Saving Recent Downloads to Google Drive

    So you’ve gotten used to saving attachments from your G-Mail straight to your Google Drive. It’s pretty handy isn’t it!?

    But what about when you download that PDF resource? You can’t just select your Drive and it goes straight there (unless you have Google Drive for your PC).

    Not to worry. There is a very easy way to do this seamlessly using Google Chrome.

    Step 1

    First you will have to open up your drive in another tab. http://drive.google.com

    Step 2

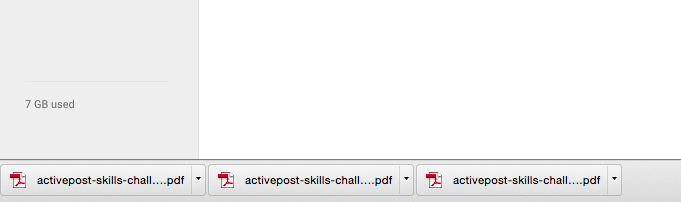
    Your downloaded files have finished (hopefully) and are now displayed down the bottom of your browser.

    All you have to do, is drag the file from the bottom of the browser into your drive window. They will then begin uploading straight away.

    Step 3

    And you’re done! You will see the little Uploads black box in the bottom right corner and be able to watch your files be uploaded into your drive.

    Screen Shot 2015-02-06 at 6.08.15 pm

    No more looking through your Downloads folder or trying to find where you downloaded them to before uploading them manually to your Google Drive. You can do it all from inside your browser window!


    I suspect that this trick will work in other browsers that list downloaded files, but have not tested it. Let me know if you’ve tried it and it works in Firefox or IE10!

  • Using Google Drive instead of My Documents

    Sometimes old habits die hard. Sometimes default settings also can be a bit of a pain. Sometimes you can set up all the synchronisation you want, but files will still get lost somewhere in the blue void.

    That’s my experience with Windows in schools. Microsoft does a very good job for the most part, but it has always been a bit of a sticking point when a teacher arrives at work on Monday and suddenly their work from the weekend goes missing. Or they’ve logged in on another computer and suddenly don’t have all the files they thought they did.

    Firstly, before we even look into using Google Drive, I want to say one thing. Back up your files.

    Then back them up again. Put them on a USB or portable storage. Take them home. Back them up again. Just in case.

    I make a habit of doing it every year at the end of the year. Some would even suggest doing it more regularly. Every term, or every month. However, now that I’m using Google Drive to store my files, I’m finding that the need to back up is much, much less than if I were purely relying on Windows and My Documents synchronisation.

    Google Drive

    Okay. So what is this amazing thing called Google Drive?

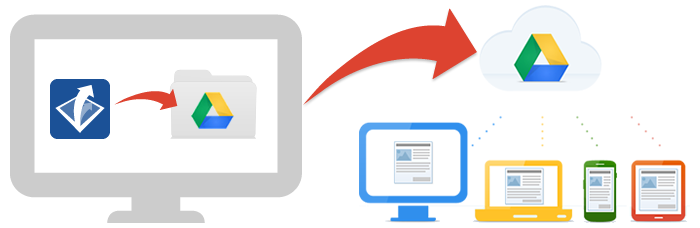
    Basically it is a server of all your files on the interweb. In a cloud some people say. It’s a USB stick, except instead of plugging it in, you simply log in online. This image below gives you an idea of how it works.

    All your files, uploaded to Drive, available on all your devices. Essentially we are setting up one big backup each time we make or create or edit or move any document in ‘My Documents’. And what’s more, space has just become unlimited with Google Apps for Education (#GAFE)

    Find out more about using Google Drive here: www.google.co.nz/drive

    From here you can click on  and create a new Google Doc, Google Sheet, Google Slide, or Create Folders to store your documents in, just as you would in My Documents.
    The Incoming tab will display all your shared files, along with any files that have been shared with you.

    The Recent tab displays the most recent files you have created or opened and worked on.

    In the Starred tab, you can see any files that you have starred (just like emails that you ‘star’ in Gmail)

    Bin is where all your deleted files are kept just in case.

    Searching and Finding

    Remember; Google is a search engine first and foremost. This means they can apply the same search functions to your documents as they can to the entire world wide web.

    At the top of the Drive home page (drive.google.com), or the Docs home page (docs.google.com), is a search box. This can search through any document you have opened or put into your drive.

    Do not forget you can use the Incoming and Recent tabs to help with finding documents.

    Integrating Google Drive with Windows

    There is a great program for Google Drive which creates a folder on your computer for your Google Drive documents. This then syncs up with your Google Drive on the internet.

    ANY file can be put onto Google Drive. It’s not just limited to Google Docs. This includes old planning files, PDF’s, images and photos of your class, worksheets, and other resources.

    1. Go to http://www.google.co.nz/drive/download/ and click on Download → Mac and PC.
    2. Once it’s downloaded open it and install with the preset default options.
    3. It will require you to sign in at some point.
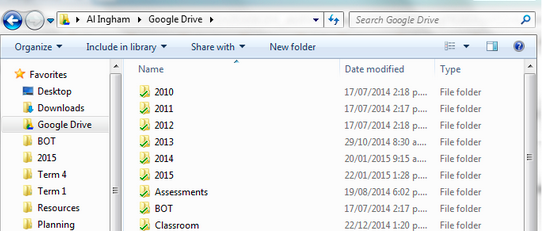
    4. You will now see a Google Drive option in your “Favourites” bar when you go to Windows Explorer (Windows+E).
      Here you can see I have copied all my teaching files over from My Documents to Google Drive.
      When I save a file, instead of saving it in My Documents, I save it to the Google Drive folder.
    5. In Libraries (down bottom left of the picture above), click on Documents


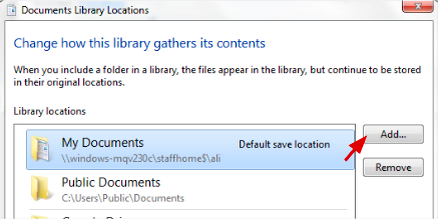
    6. You will see a bar at the top of the window. Click on Includes: 2 locations
      (Note: Mine says 3, yours may have a different number)
    7. On the right of the pop up box, click on Add.
    8. Find your Google Drive folder (should still be on the right in your favourites) and click on Include folder.
    9. You should now have your Google Drive folder showing up as a location.
    10. Right click on Google Drive and select “Set as default save location
      I then right click on it and select “Move Up” until it is at the top. This means when you click on “Documents”, your Google Drive location will show up at the top.
    11. Click on OK. And now you are all set up and ready to go!

    Tips and Tricks

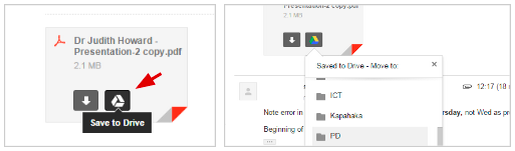
    1. You can save attachments straight from emails to your drive. Just click on the Drive icon that shows over the attachment in Gmail. Then you can choose which folder to put it in afterwards, and open it in your Google Drive.
    2. Use the little arrow at the end of the Google Search bar to filter your search results before you search. Maybe you can’t remember the title of the document, but you can remember that it was shared by a particular person or was a PDF. You can select these first. This arrow also works in Docs, Gmail, and all the other Google Apps.
  • Google Docs for Collaboration

    Using Google docs to create documents is easy. It especially works well when a document is being created by a small team, with each user the document is shared with able to make suggestions or edits.

    Create a New Document

    Open up Google Docs (http://docs.google.com)
    Click on the plus + in the bottom right corner, or open an existing document.

    GD-1

    Make sure that you change the name of the document! Click on the name of the document and rename it. Click OK to save the name change.GD-3

    Sharing Google Docs

    The first thing you will want to do (possibly) is share the document with others. To do this simply click on the blue share button in the top right corner.

    GD-4

    Then just simply enter in the email addresses of those who you wish to share this document with.

    GD-5

    You can change these permissions after you add them by clicking on the words below the “People” input box which says “Shared with……………”

    You are always the owner of any document that you create.
    Can edit are able to completely change the document with the same level as owners
    Can comment allows people to make comments on the side of the document, but are unable to change anything in the document itself.
    Can view allows people to see the document, but not make any comments or edits.

    Some common uses for these roles:

    Can edit: Another teacher that you are collaborating with.
    Can comment: Sharing a unit plan with another education professional who you want their feedback on. This may also include BLENZ Teachers, RTLB, Van Asch Teachers etc…
    Can view: Students who have logged on and you want to show them an assignment that they need to work on the Chromebooks with.

    Sharing is available for ANY Google Doc, not just the Unit Template.

    Commenting and Collaborating

    The great thing about Google Docs is the ability for others to contribute and edit a document. Doing this can take different forms depending on what you want to do.
    On the right hand side, below the share button is the style of ‘editing’ that you can use.

    GD-7

    • Editing: This is for editing the document in place. This is the default editing mode and makes the changes to the document.
    • Suggesting: This is very useful when collaborating with others. Using this mode, users can make suggestions of additions or changes to the document. Upon doing this, it puts it in a different colour, and puts a ‘comment’ box to the right of the document. It also shows an “Accept” or “Reject” tick box system, in which the other collaborators can either accept the ‘suggestions’ or remove them. This is very useful as it shows up in a different colour, and also allows for draft entries, especially for when you’re not sure or want to put forward an idea for others.
    • Viewing: Quite simply, this removes all editing capabilities, and just allows you to read and print the document.

    GD-8In addition to this, if you have a “Can edit” or “Can comment” status when the document is shared with you, there is a Comments section next to the Share button.
    These allow you to leave a comment for the other editors and commentators that you have shared the document with, or with documents that others have shared with you.
    Comments can be applied to specific parts of the document by first selecting the text, and then clicking on Comments → Add a comment as above.

    Revision History

    The really important part of Google Docs is that it keeps EVERY change you make. It saves automatically, and keeps a record of those saves.

    This means that any changes you make are kept in a log.

    GD-9Click on See revision history. A window will show up on the right which will have a list of major changes and save dates. You can click through these to see the changes.
    If you need a more detailed view of specific changes, you can click on ‘Show more detailed revisions’.
    This will show just about every auto-save in the history of the document.
    Clicking on each revision will restore that version. This allows you to go back to a previous edit of the document, if you or any of your collaborators have made a mistake you wish to go back and remedy.

    Other than that, Google Docs pretty much operates as any other Word Processor. Feel free to explore the menu’s to find out more. Google’s Help menu has a lot of good information about how to use it.